Our latest update to Cura LulzBot Edition, or Cura LE for short, brings a fresh software interface, numerous new slicing options, and better print quality than ever before to your LulzBot 3D Printer!
This transitional guide is designed to help users familiar with Legacy Cura, highlighting changes in the user interface, options that you might be familiar with but that have been moved or renamed, and new options.
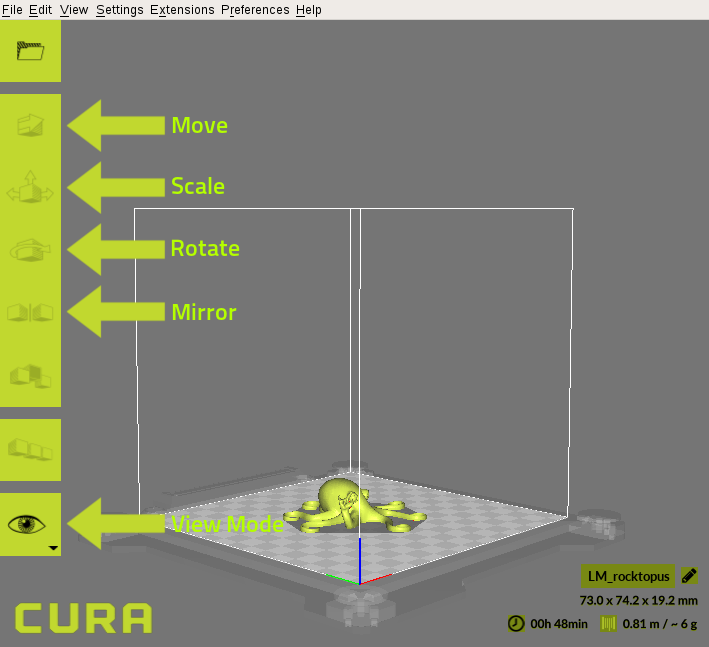
Scale, Rotate, Move, and View options are now on the left-hand side of the screen in Cura LE. Here are a few changes to each option in Cura LE:
MOVE
Cura LE adds more precision to positioning your objects on the virtual print bed. You can still left click on your model in model view and drag it around the print bed, but now with Move selected, you can also move your model using a handle for each axis (blue for Z, red for X, green for Y) or by entering in the position for each axis for more precise movement.
A handy new feature in Move is adjusting the print in negative Z. This will cut off the bottom of the model and start the print where it intersects the virtual print bed - useful for improving adhesion on models without flat bases. In Legacy Cura, this was an independent slicing setting called 'Cut off object bottom.'
SCALE
Scale now has measurements in percentage and millimeters, so instead of the 1.00 you saw in Legacy Cura, you will now see 100%. Snap Scaling will keep your scaling in increments of 10% when using the red/blue/green axis boxes to drag and scale.
MIRROR
Mirror is unchanged, except instead of buttons next to the Mirror option there will be a handle for each axis, giving you the option to mirror in that axis.
VIEW MODE
Solid and X-ray view are unchanged from the Normal/X-ray view found in Legacy Cura. Layer view has had a few updates and better visualization.
Layer View functions are very similar to the Layer View in Legacy Cura. When Layer View is selected, you can scroll through each layer of your print using a slide bar in the top-left corner of the screen. Options for what to show in Layer are also located in the top left.
Selecting your material profile in Cura LE is very similar to Legacy Cura. Instead of Quickprint, you will now use Recommended settings. These Print Setup options have been moved from the left-hand side of the screen to the right-hand side. Here is a list of options for filament profiles that have changed names, but are basically the same in function:
Legacy Cura ▶ Cura LE
Quickprint ▶ Recommended
Material ease of use ▶ Category
Select a quickprint ▶ Profile
Print support structure ▶ Generate Support
Print brim ▶ Build Plate Adhesion
A new addition to the Recommended Print Setup is the option to select from a few different pre-defined Infill percentages without the need to go into Custom Settings.
You can save the G-code for your print in the bottom-right corner of the screen. First select the down arrow to the right of Print via USB, then select Save to File. If a printer is not connected to the computer, this button will just be save to file. If an SD card is mounted, you will also see a Save to Removeable Drive option which will in one-click save the gcode to your SD card using the 3D model's file name.
Users familiar with Legacy Cura used to switch from Quickprint to Full Settings to make changes to their print settings, and would access the Expert Settings window for even more options. Now, all of those options and more are in one place, and accessing them is easier with a Recommended -Custom toggle next to Print Setup on the right-hand side of the screen.
One change to this section is that switching between Recommended and Custom will not erase any changes you have made in your print settings. If you make any changes in Custom, they will still be applied to your print if you switch the toggle back to Recommended.
If there are any changes made to the currently selected profile, you will see a small grey star next to profile. If you do want to undo any custom changes, you can click the down arrow to the right of the profile (used to select the profile) and click Discard Current changes.
Cura LE’s Custom mode now has an added set of features that makes navigation and print tuning faster and easier. When the Recommended – Custom Toggle is set to Custom, you will have a set of categories for print settings, ranging from Quality to Experimental features. Clicking on one of these categories will expand it to show the various settings in that category, and clicking on it again will collapse it.
Hovering over each setting with your mouse will bring up a tool tip with helpful information on what that setting does and how it might be changed.
Looking for something specific? Search for any print setting using the search bar above the print setting categories and below the Recommended – Custom toggle.
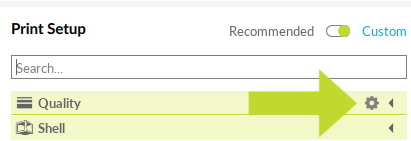
Customize setting visibility by clicking the gear icon next to a settings category (it will become visible when you hover over a category). This will bring up a menu with all the print settings available in Cura LE. Simply un-check any that you do not want to be visible in Custom mode.
Note that even if you make a setting invisible it will still be applied to your print.
Filament profile files had a .ini extension in Legacy Cura. They now have an extension of .curaprofile. In addition to a profile, there is a file for material specific settings as well, with an extension of .fdm_material.
Unfortunatelty, the profile files from Legacy Cura are not compatible with Cura LE.
Importing Filament Profiles and Saving Custom Profiles
Due to the separation of Quickprint/Full Settings in Legacy Cura, it was useful to import a filament profile while in Full Settings. There is less of a separation between Recommended and Custom settings in Cura LE, so importing profiles is not as important in Cura LE.
If you do want to import a filament profile into Cura LE, it can be done by going to:
Settings > Profile > Manage Profile > Import
Then navigate to the location of the file you want to import. The profile will now be added to the list of profiles for the given material/printer you have selected. You can also import a material file by going to Material instead of Profile.
Saving your own custom changes is much easier with Cura LE as well.
To save the current changes to your filament profile, on the right hand of the screen under print setup, click on the Profile drop-down menu > Create profile from current settings/overrides > Enter in the name of your profile > Ok
Note: All of the default profiles are protected from changes, so the profile name cannot match one of the defaults.
Switching or adding printers and tool heads is now done under the Settings tab at the top of the screen. The settings tab has replaced the Machine tab from Legacy Cura.
To add a new printer or tool head you can now go to: Settings > Printer > Add Printer
Cura LE will then bring up a screen which features the specific attributes of your LulzBot 3D Printer model. These factory default settings should not be altered unless you are an expert user with a specific reason to do so! All you need to do is click the Finish button in the bottom right of the window. Your 3D printer is almost ready!
Cura LE now checks the firmware on your printer at the start of a print to let you know if it is out of date, and will prompt you to update the firmware before printing. This can be seen in the settings tab, with the active printer having a black dot next to it.
In Legacy Cura, connecting to your printer and controlling it would be done using the control button, and a new Cura window would pop up to control the printer.
Cura LE controls the print from within the main Cura window using the Print Monitor tab. You can find the Print Monitor tab in the top-right corner of the screen (it looks like a small LulzBot 3D Printer).
This will replace the Print Setup panel at the right side of the screen with the Print Monitor and Control panel. You can switch back to Print Setup by clicking the Print Setup (cube icon) tab to the right of Print Monitor. A green check mark on Print Monitor indicates that a printer is detected and ready to be connected to, while a blue circle with three white dots indicates that the printer is currently carrying out a command or print.
You can also use the Print Via USB button in the bottom right-corner of the screen to bring up the Print Monitor panel, but unlike clicking the Print Monitor tab, this will also attempt to start your print. The print can be stopped by clicking the Abort Print button in the bottom right-hand corner of the Print Monitor.
The top half of print monitor is largely the same as the old control window, showing the status of the printer, current temperature, and printing time.
You can heat up the extruder and bed in this top section of Print Monitor the same as in Legacy Cura, by entering in your desired temperature and clicking Pre-heat. Note that if no temperature is in the input field, selecting Pre-heat will use the temperature listed in the current filament profile.
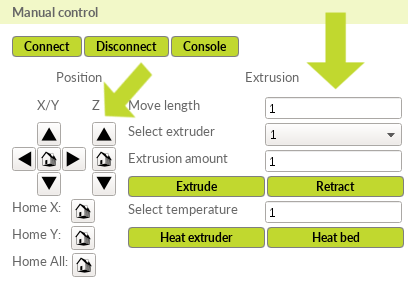
Manual printer controls have changed with Cura LE. The old control window had a radial dial for each axis you want to move and how much you want to move it. Now in the Manual control section, you just need to enter in the length you want to move an axis (in mm) under Move Length and click the appropriate directional arrow for the axis you want to move. Extrusion length can be controlled the same way using Extrusion amount and the Extrude/Retract buttons.
The console can also be accessed in this section from the Console button, which will bring up a window with the current output from the printer and a text box to send commands to the printer.
Buttons to home each axis of the printer can also be found in this section.
Below the Manual control section are several Predefined Commands, useful for operating the printer. While most are self-explanatory, Cold Pull warrants further explaination.
Cold Pulls are used to clean the hot end and nozzle opening. The Cold Pull command will heat your extruder up to the Printing Temperature value for the material you have selected. It will then make a very small extrusion movement and cool the nozzle down to Wipe Temperature and stay there. You must then manually pull the filament out of the tool head.
Cold pull is disabled when the V3 Dual Extruder tool head is selected, due to a different filament feed system.
Finally, at the bottom of the Print Monitor screen, we have buttons for Start Print, Pause, and Abort Print.
Dual extrusion prints have many more options in Cura LE than in Legacy Cura. Like Legacy Cura, models are still loaded one at a time using Open File.
With multiple models loaded on the virtual build plate, you are now able to select if a model is going to be printed with extruder one or extruder two. First, left click a model, then on the left-hand side of the screen there will be an option to print with either extruder, and the selected extruder will be darkened.
You can also right click a model and select which extruder will be used to print it using the context menu.
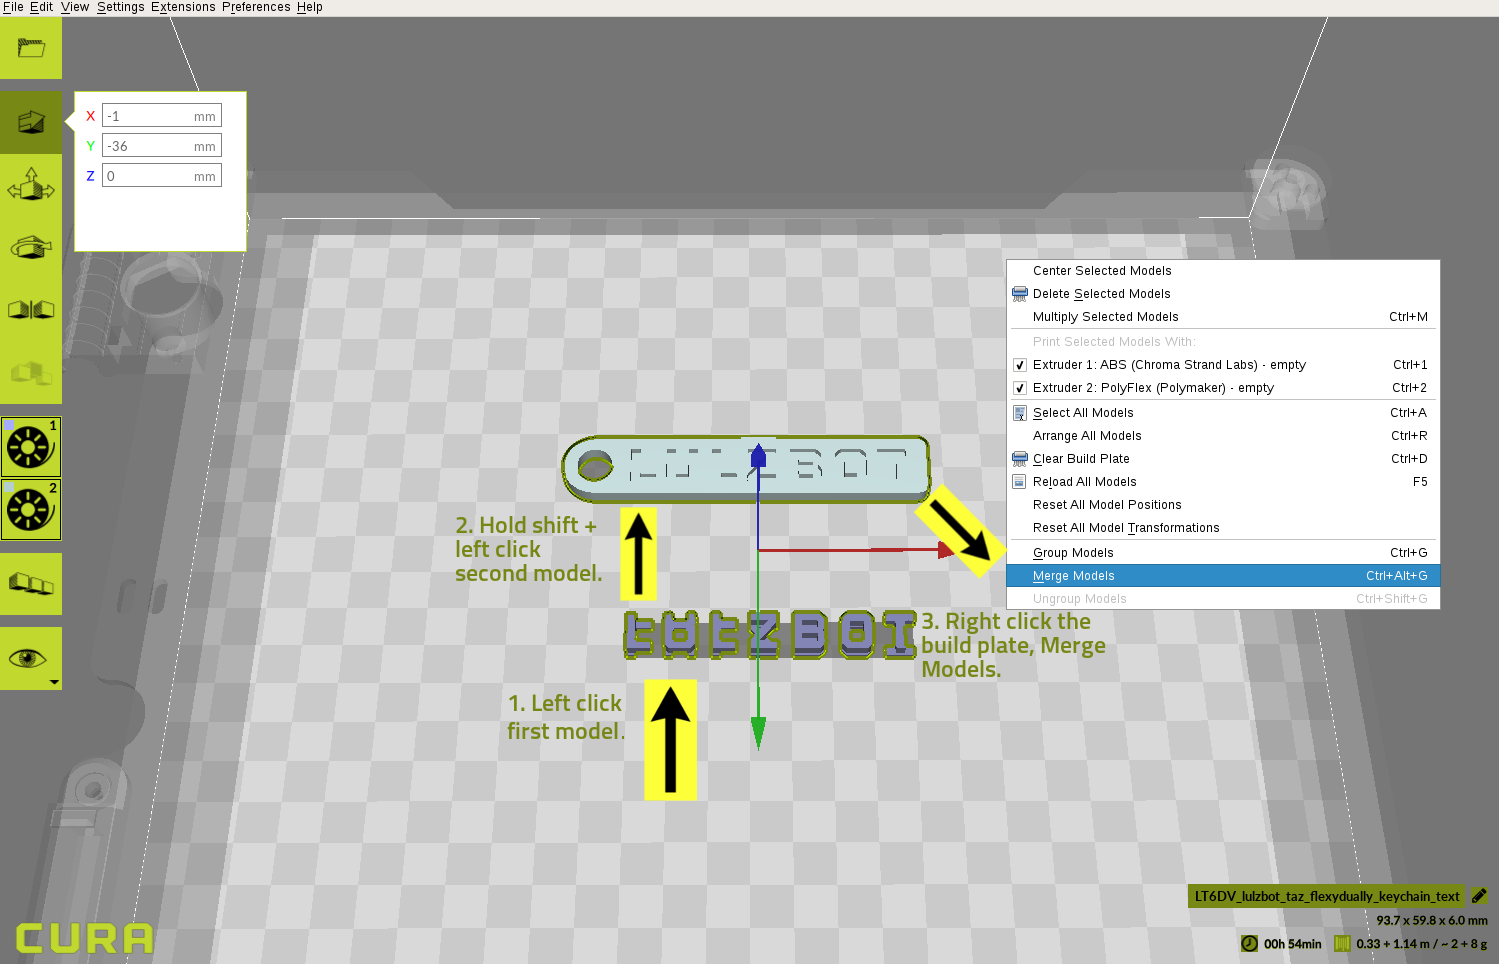
Merging two models is very similar to Legacy Cura. First, left click one of your models, then while holding the shift key on your keyboard left click the second model. This will select both models at the same time. Next, right click an empty section of the virtual build plate to bring up the context menu and select Merge Models.
Print Setup with a Dual Extruder v3 in Cura LE will have a tab for Extruder 1 and Extruder 2. The settings in each tab can be changed individually.
Print Monitor will also have menu options to select each extruder, so you can heat or give extrusion/retraction commands to each individually.
There are so many new features in Cura LulzBot Edition that we don't have space to list them all here. From new infill patterns, to better bridging and support generation, to awesome experimental features like wire printing and fuzzy skin, there is a lot to explore. Fortunately there are two great features in Cura LE that make this more fun than it is daunting.
Tool Tips - Hover the mouse cursor over just about any setting in Cura LE and a green Tool Tip will pop up explaining what it is.
Print Setup Search - Looking for a particular slicing setting among all the new options? Use the search bar at the top of the Print Setup panel to quickly find what you need.
